


PREMIERE UTILISATION
Merci d’avoir acquis Tilt Calculator – j’espère que cet outil vous sera utile pour vos photographies. Cette page est un didacticiel simple qui vous permettra de maîtriser cette application rapidement. N’hésitez pas à me contacter si vous avez besoin d’aide ou de plus amples informations.
Notez qu’une galerie spécifique contient plusieurs photos prises avec l’aide de Tilt Calculator.
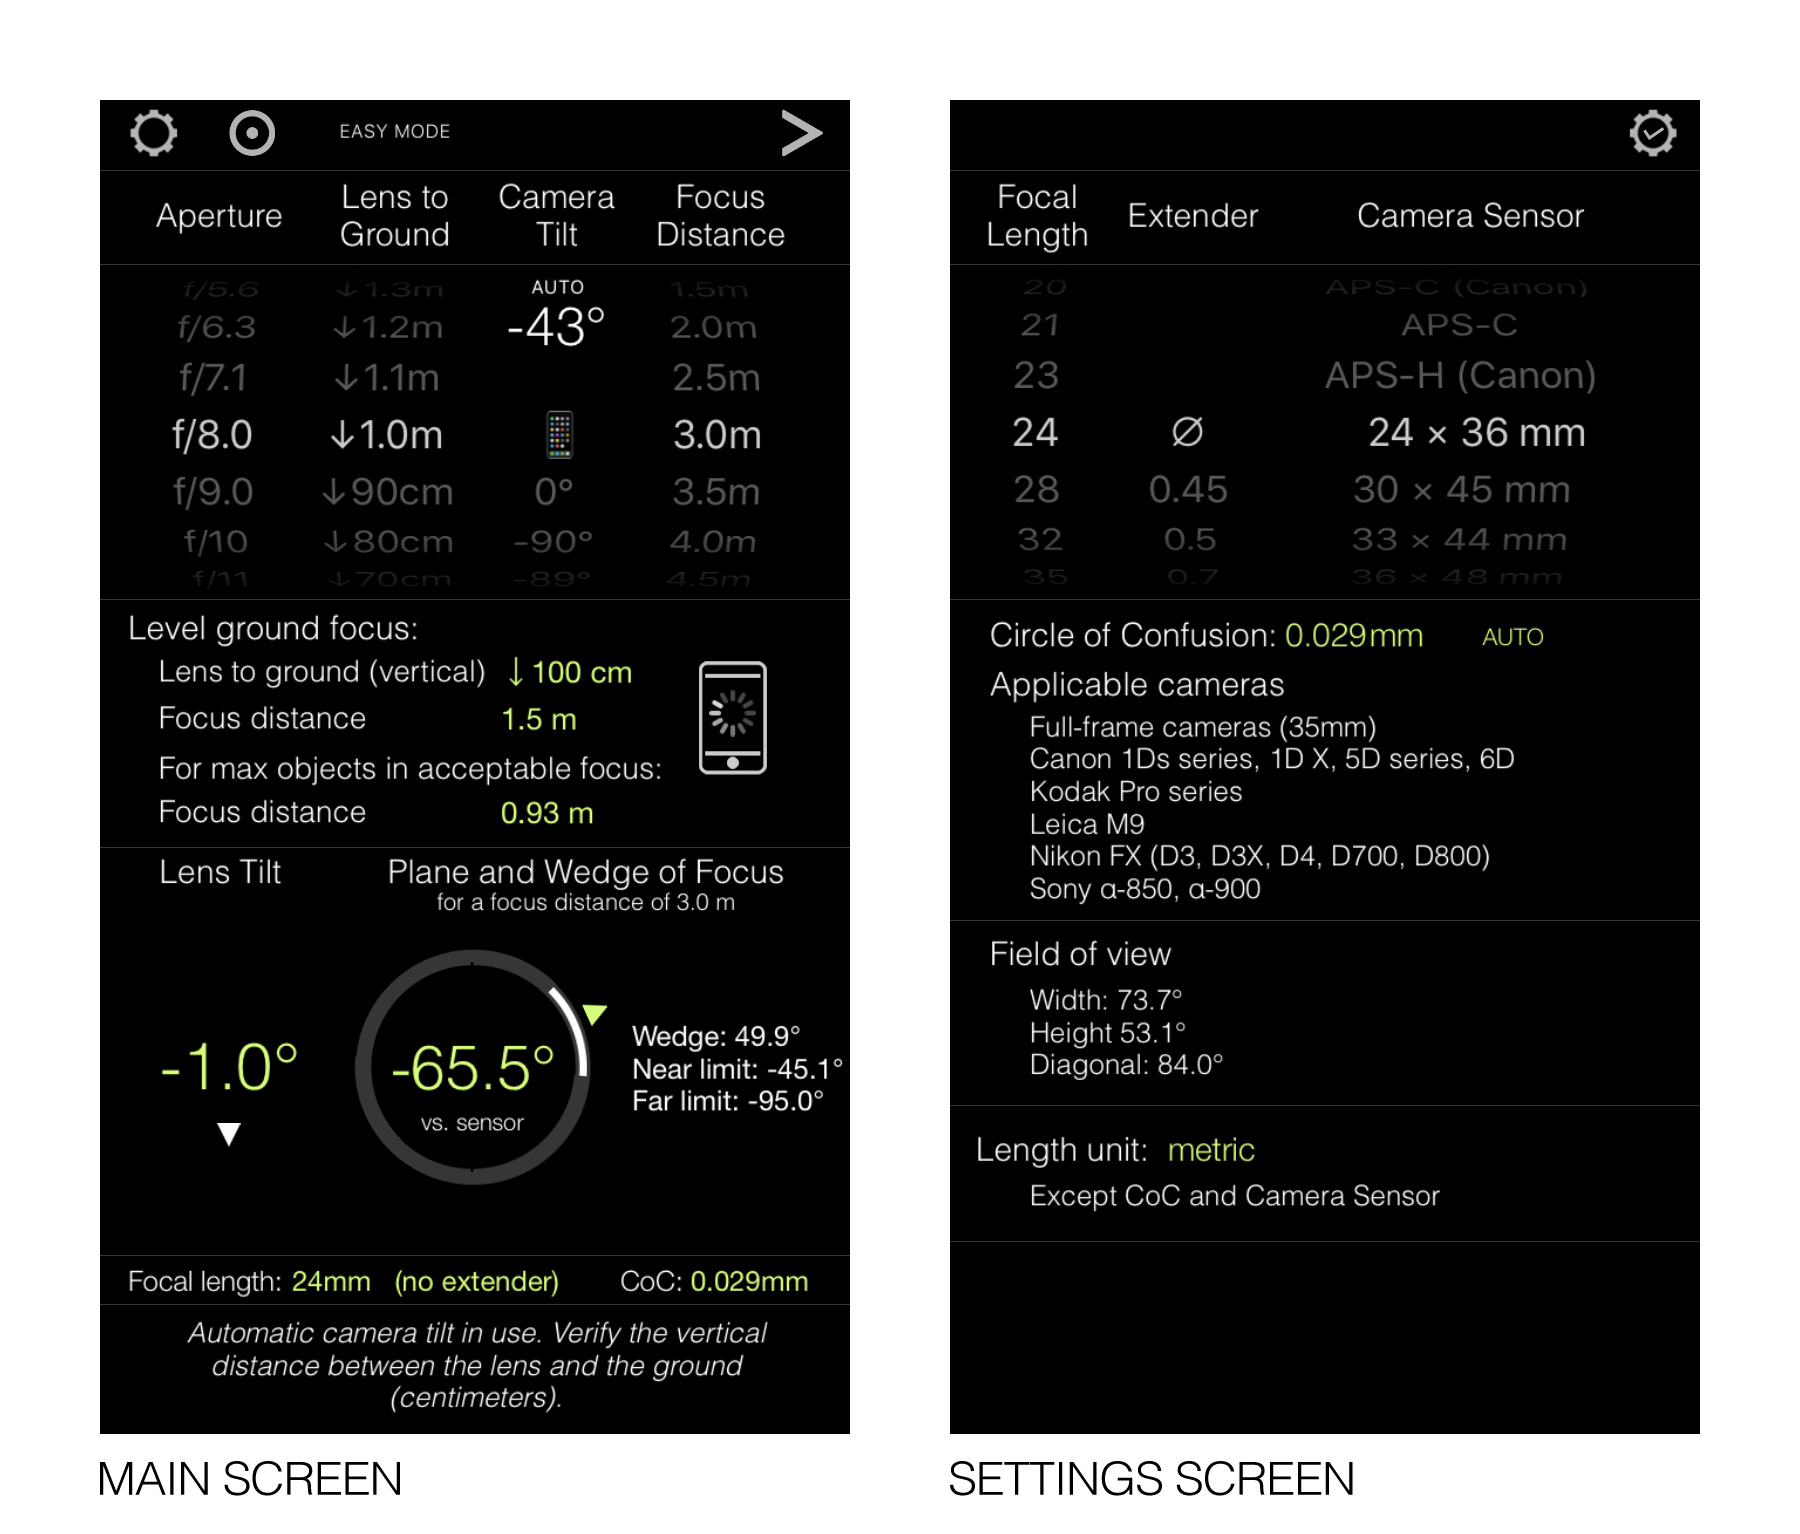
Tilt Calculator est organisé essentiellement autour de deux écrans: un écran principal et un écran de réglages, voir ci-dessous. Les réglages sont accessibles depuis l’écran principal. Tilt Calculator contient également plusieurs pages d’information que vous pouvez consulter comme bon vous semble (également accessibles depuis l’écran principal).
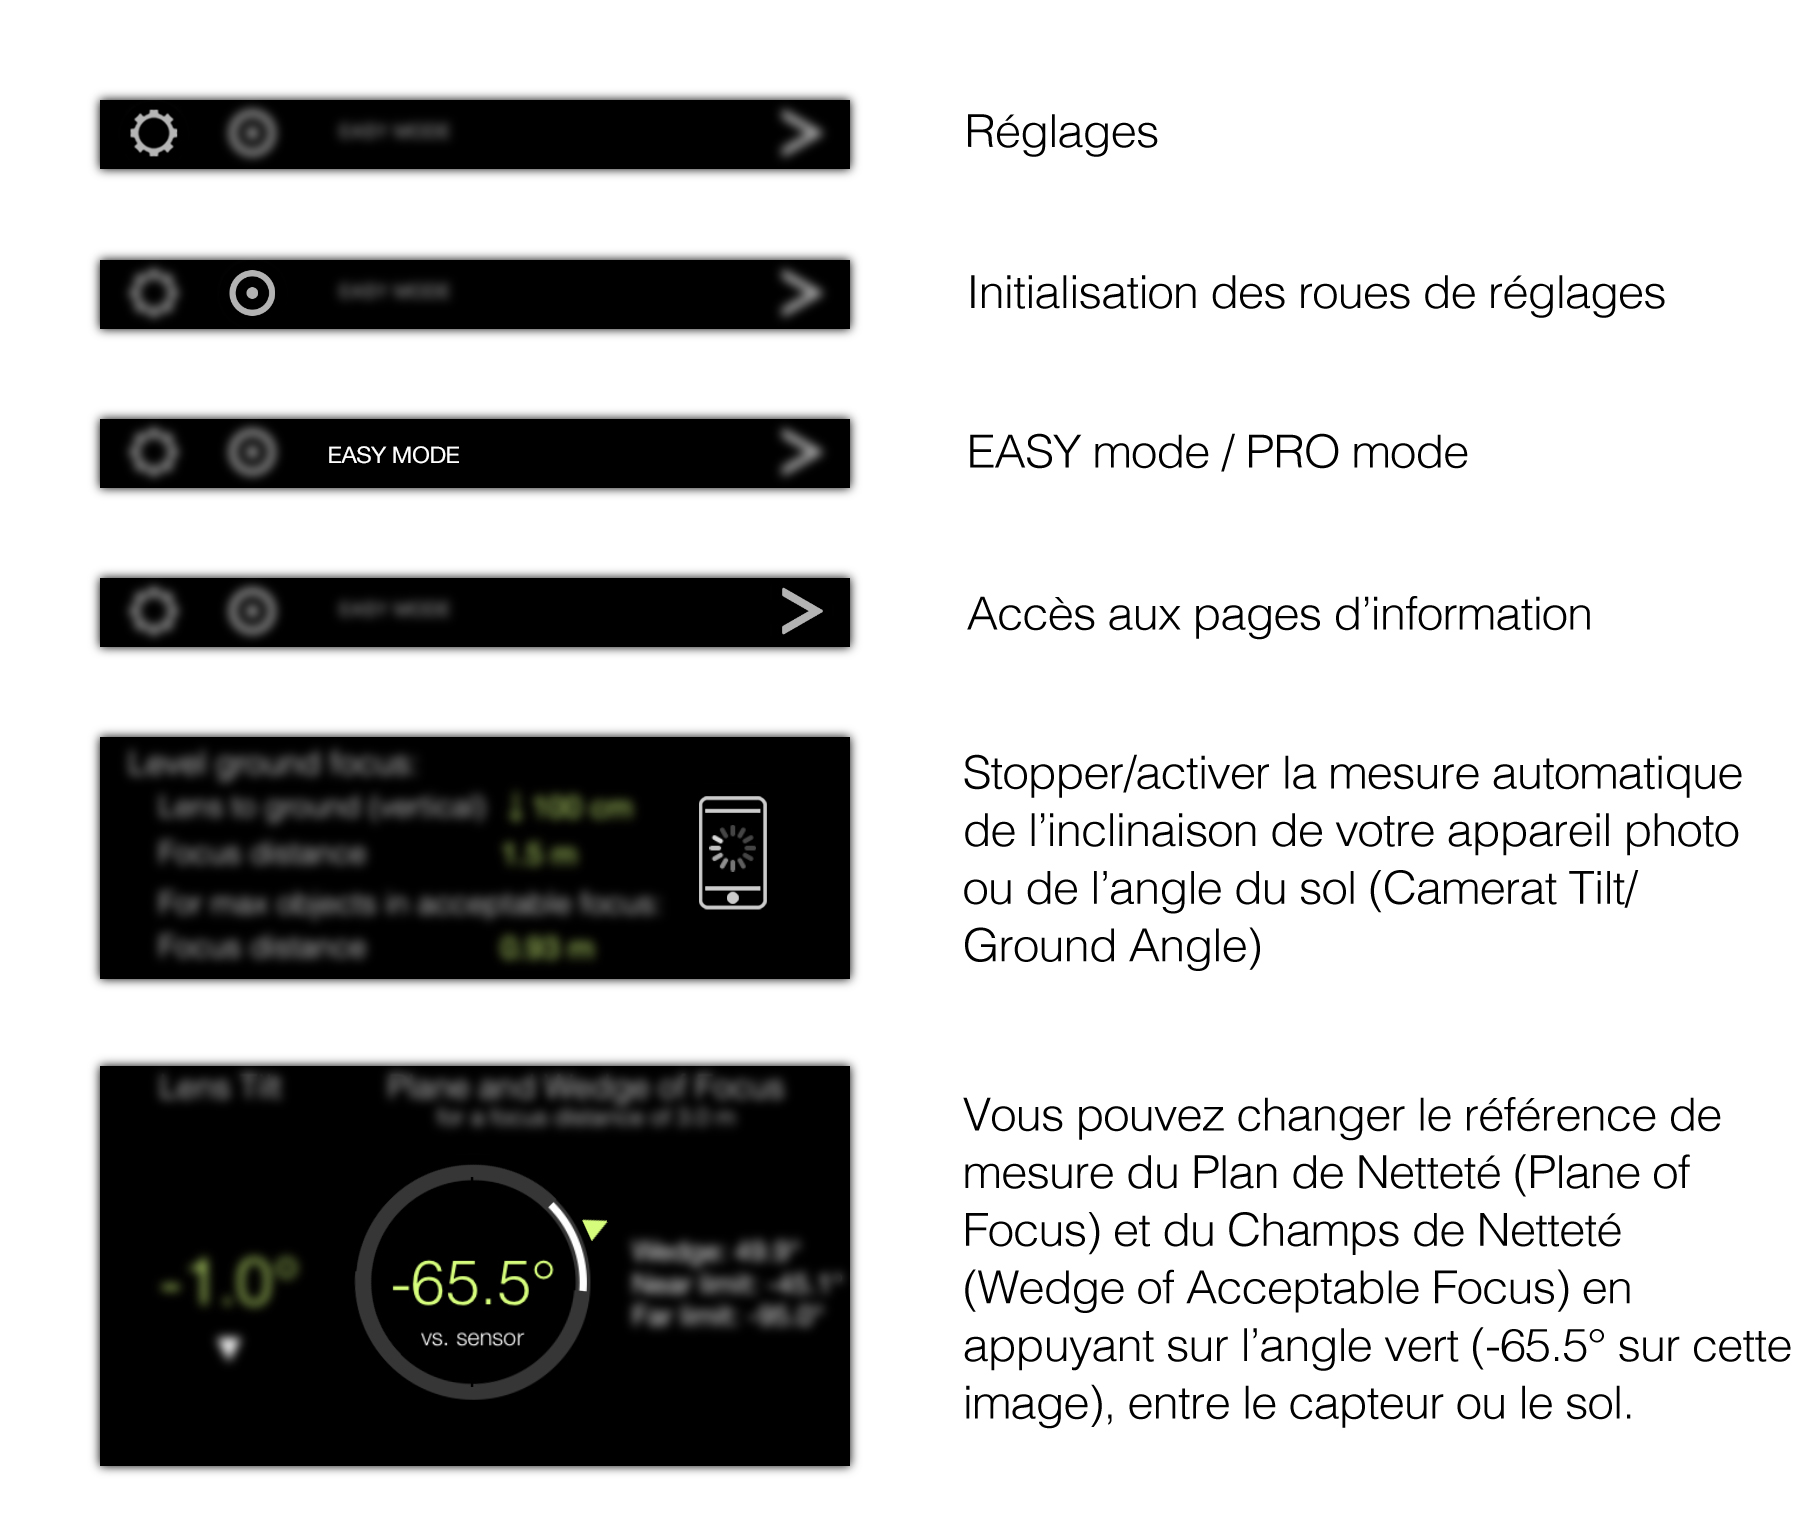
Pour contrôler Tilt Calculator, des roues ainsi que plusieurs boutons (graphiques et textes) sont présents. Ceux-ci sont résumés sur l’image ci-dessous. Vous pouvez également appuyer sur différents labels pour afficher leur usage.
REGLAGES (Ecran de Réglages)
L’écran de réglage vous permet d’ajuster les paramètres de base de l’application i.e.- La Distance Focale (Focal Length) of your lens
- L’Extension de la Distance Focale (Focal Length Extender) – qui n’est autre qu’un facteur multiplicateur de la Distance Focale
- La Taille du Capteur/Film (Camera Sensor/Film Size) de votre appareil photo of your camera
TILT CALCULATOR (Ecran Principal)
Tilt Calculator est un outil fait sur mesure dont le but principal est le calcul de l’angle de bascule à appliquer à votre objectif afin d’avoir le sol net. Le sol peut être ce que vous voulez du moment que c’est la zone principale de netteté. Tilt Calculator a été conçu principalement autour de la photo de paysage mais peut également être utilisé dans d’autres situations e.g. photos de produits.
Tilt Calculator vous suppose familier avec les notions principales d’opération d’un objectif à bascule i.e. bascule, ligne charnière, plan de netteté et champs de netteté – ceux-ci vous sont décrits au bas de cette page. De plus, Tilt Calculator contient plusieurs pages d’information (dont une interactive) qui vous les rappellent également.
L’écran princial de Tilt Calculator contient trois parties distinctes: HAUT (Entrées), MILIEU (Sorties I), BAS (Sorties II), voir ci-dessous. Tout en bas de l’écran, vous sont indiqués la Distance Focale que vous avez choisie (plus extension si utilisée), ainsi que plusieurs messages de rappel.
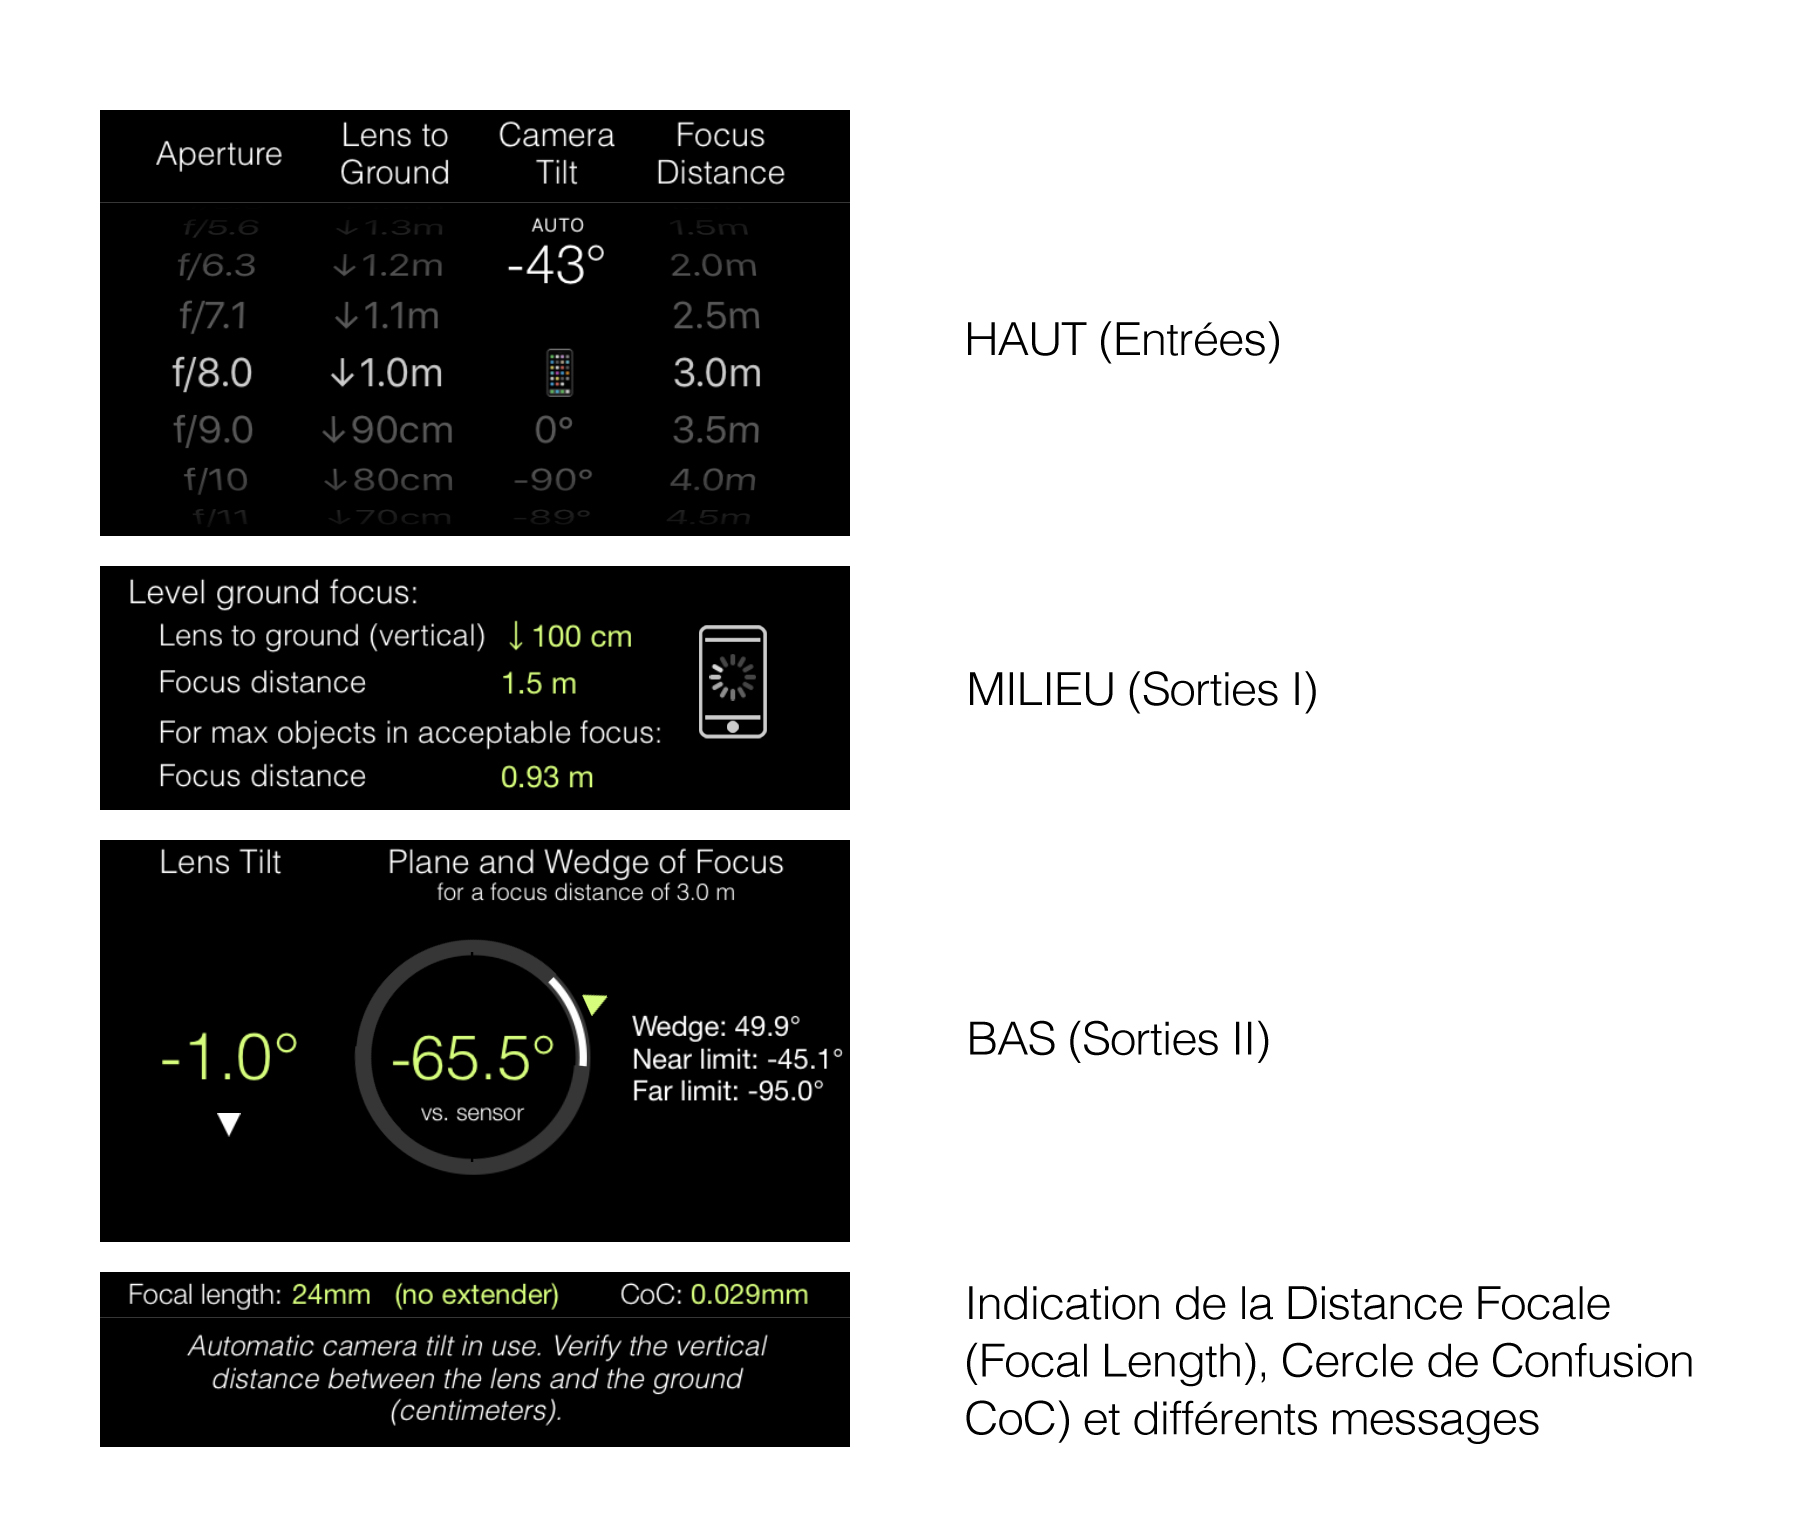
HAUT (Entrées)
Les roues de réglage permettent d’ajuster: La Distance Objectif-sol (Lens-to-ground Distance) (verticale), l’Inclinaison de votre appareil photo (Camera Tilt) (et celle du Sol (Ground Angle)), l’Ouverture de l’objectif (Lens Aperture), et la Distance Focale.
Les roues principales contrôlent les variables entrantes qui influencent directement le calcul de bascule de l’objectif. Les roues secondaires contrôlent les variables entrantes qui vous permettent juste la visualisation de leurs effets sur les plan et champs de netteté; celles-ci n’ont aucune influence sur le calcul de bascule.
- The Lens-to-Ground Distance (vertical): the vertical distance that separates the lens from the ground (where focus will be). Adjust the scroll wheel according to your set-up.
- The Camera Tilt: the tilt of your camera – do not confuse this with the lens tilt. The Camera Tilt is either measured automatically by Tilt Calculator or entered manually. Automatic measurement is done when the Camera Tilt scroll wheel is set to
 . See below for automatic measurement of the Camera Tilt.
 - The Ground Angle: it is set level i.e. 0º by default. To change it, scroll the Camera Tilt scroll wheel downwards until it displays ⏚ (and the label then changes to Ground Angle) – it is always measured automatically by Tilt Calculator. See below for automatic measurement of the Ground Angle.
- The Lens Aperture: The Lens Aperture affects the width of the Wedge of Acceptable Focus, similarly to how it affects the depth of field on a normal lens. The wider the aperture, the narrower the wedge of acceptable focus, and vice-versa. Set it to visualize the effect on the wedge of acceptable focus so you can adjust your lens properly. The Lens Aperture has no effect on the calculated lens tilt.
- The Focus Distance: The Focus Distance affects both the position of the Plane of Focus and that of the Wedge of Acceptable Focus. It also affects the width of the Wedge of Acceptable Focus for a given Lens Aperture – the shorter the Focus Distance, the narrower the Wedge of Acceptable Focus, and vice-versa. Set it to visualize its effect on the Plane of Focus and Wedge of Acceptable Focus. You can use this input e.g. to verify the recommended focus distances in the MIDDLE part of screen. The Focus Distance scroll wheel has no effect on the calculated lens tilt.
- Camera Tilt (): Scroll the Camera Tilt scroll wheel downwards until it shows . Then place your phone on the back of the body of your camera, either vertically or horizontally as best suits you. When the measurement is done, press the white iPhone button on the MIDDLE part of the screen. The measured Camera Tilt is then recorded and displayed in green.
- Ground Angle (⏚): Scroll the Camera Tilt scroll wheel downwards until it shows ‘⏚’. Then place your phone along the ground. When the measurement is done, press the white iPhone button on the MIDDLE part of the screen. The measured Ground Angle is then recorded and displayed in the MIDDLE part of the screen (x° ground focus). Thereafter turn the scroll wheel back to Camera Tilt (e.g. or manual value) to set the Camera Tilt – the Ground Angle is kept in memory. To reset the ground angle to being level (0°), turn the scroll wheel to Ground Angle (⏚) and then turn it to Camera Tilt (either automatic or manual).
IMPORTANT NOTE: always measure the Ground Angle before the Camera Tilt.
- The first recommended focus distance sets the plane of focus exactly on the ground (i.e the lower part of the wedge of acceptable focus is then below ground).
- The second recommended focus distance sets the lower part of the wedge of acceptable focus on the ground; this maximizes the number of objects in focus on and above the ground.
BASICS
The hinge line is an imaginary line around which the plane of focus and wedge of acceptable focus rotate, hence the name “hinge”. The exact position of the hinge line is controlled by the lens tilt. The hinge line sits parallel to the axis of lens tilt. The more your lens is tilted the closer the hinge line is to your camera. The less your lens is tilted the further away the hinge line is to your camera. When your lens is not tilted, the hinge line is therefore situated at infinity, hence the plane of focus is parallel to your lens section i.e. it operates as a normal lens. When your lens is tilted downwards, the hinge line is situated below your camera. The Plane of Focus is self-explanatory. It is the plane on which your lens achieves perfect focus. The plane of focus intersects the hinge line and rotates around it. The amount of rotation is controlled by the focus distance of your lens. The plane of focus is situated at most at a right angle (90º) vs. the camera sensor, when the focus distance is set to infinity. From this derives a very simple use of a Tilt-Shift Lens – with a level ground, and focus set to infinity, you can precisely adjust the lens tilt by slowly tilting (downwards) until the ground is in focus and voilà, done. The Wedge of Acceptable Focus is also self-explanatory. It is the area within two planes expanding from the hinge line (and between which lies the plane of focus) within which your lens achieves acceptable focus. ‘Acceptable’ focus is determined as a function of the Circle of Confusion (see settings). The wider your lens aperture, the narrower the wedge of acceptable focus. Note the wedge of acceptable focus is also affected by the focus distance of your lens such that it reduces with the focus distance.WORKFLOW (EASY mode)
Assuming you have set the basic settings of Tilt Calculator i.e. Focal Length, Lens Extender and Camera Sensor/Film Size, you then proceed as follows:- Compose your image, with the camera lens preferably not tilted.
- Measure the vertical distance between your lens and the ground and set the Lens-to-Ground scroll wheel accordingly (closest value).
- If the ground is not level (horizontal), measure the Ground Angle using the automatic measurement in Tilt Calculator.
- Measure the Camera Tilt either automatically using the automatic measurement in Tilt Calculator, or manually (and if the latter, enter the Camera Tilt manually in the the App.
- Use the calculated Lens Tilt to adjust your lens accordingly.
- Set the aperture of your lens according to your preferred exposure time. Then input this aperture in Tilt Calculator.
- Adjust the focus distance of your lens according to one of the recommended focus distances in the MIDDLE part of the screen – use LiveView on your camera to adjust it finely. Preferably use the one for max. objects in acceptable focus, unless the ground consists e.g. of a clear surface like a body of water with objects below it that you would prefer in focus.
- You can verify the effect of the selected focus distance by turning the scroll wheel accordingly. Note the scroll wheel may not list all possible focus distances.
PRIVACY POLICY
Tilt Calculator only records locally on your device the settings needed to make the App work, namely:- Permanent storage (i.e. data remain stored when leaving the App): Focal Length (and extender), Camera Sensor Size, Circle of Confusion, Length Unit (metric or imperial/US)
- Volatile storage (i.e. data are erased when leaving the App): Lens Aperture, Lens-to-Ground distance, Camera Tilt, Ground Angle and Focus Distance as well as all outputs (Lens Tilt, Plane of Focus, Wedge of Acceptable Focus, Recommended Focus Distances.
- None of your personal information is stored. The App also works fully offline and does not require or use any data connectivity except for sending in-app emails.